5k Mud Run and Brewfest located at the Wooden Shoe Tulip Farm.


Sunday 8/7/2016
We started our trip off at Painted Hills & John Day Fossil Beds National Monument.


Monday 8/8/2016
Spent the night in the Strawberry Mountain Wilderness with a short morning hike up to Strawberry Lake.
Total distance: 3.0 mi
Max elevation: 6,325 ft
Min elevation: 5,702 ft
Total climbing: 1,060 ft
Total descent: –1,010 ft
Total Time: 01:17:23


Tuesday 8/9/2016 – Thursday 8/11/2016
After a night in Joseph at a Bed & Breakfast we started our hike to Mirror Lake early Tuesday afternoon. A lot of people at the lake, camps setup about every 20-30 meters along the cliffs overlooking the lake. We avoided the crowds by heading to higher ground setting up camp on the rocks. On Day 2 we hiked over the pass to Minam Lake. Much less crowded but decided to put in a few more miles and found a great campsite along Lostine river. Day 3 was an easy 5 mile hike out.
Total distance: 19.8 mi
Max elevation: 8,540 ft
Min elevation: 5,577 ft
Total climbing: 6,483 ft
Total descent: –6,447 ft
Total Time: 22:08:22


Saturday, December 12th – Wednesday, December 23rd 2015
Flew in to Papeete & took the Ferry over to Moorea.
Spent first 5 nights at Tea & Alex’s bungalows
Another 5 nights in Tiahura at Moorea’s House of Peace
Lots of reading, sunsets & kayaking. Here’s our favorite 3 mile loop that included a small deserted island we had completely to ourselves.


Friday 10/23/2015 – Saturday 10/24/2015
Camped Friday night on Diamond Lake at the main site on the North East end of the lake at site C6 next to the lake.
A great trip with stunning views.
We made it within a few 100 yards of the summit but puppy was getting tired and the scree was getting worse so we called it quits. No one wants a pup with sore paws.


While Geocaching is a very public activity with most cache’s listed on public sites, there are times when it’s fun to have a private cache list. As of this writing there doesn’t appear to be any good way to do this. Eventually I’ll write an app, but until then here’s how we can share a geocache list.
This method was created to allow some safe, geocaching fun during the 2020 covid epidemic. I’ve hidden small bears that don’t require to be touched or opened. Just found.
It was inspired by the Bear Hunt for kids where people put teddy bears in their windows so children can walk around the neighborhood and “find” the bears. My bears are tiny, and hidden around the neighborhood.
So we avoid gatherings, the GPX file that has all the locations is shared with one family at a time, then passed along to the next after they’ve discovered all the bears.
Here’s a few examples of what to look for…


Any app that can import a GPX file can be used. I didn’t mention the official Geocaching app because it requires a monthly subscription to import files. Below are a few I’ve tested.
The general idea is to save your GPX file that contains your cache’s to Dropbox. Then load that file into an app and start looking for bears!
GPX Viewer, $1.99
One of the best I’ve found purely due to it’s simplicity.
PROS
Price
Easy to use
CONS
Can’t mark cache’s as found
Doesn’t display all the cache information (like hints)
Directions
Cachly, $4.99
More expensive than GPX Viewer but a lot more features. If the price doesn’t bother you and clicking a few more buttons to get a file imported is OK, this is the best choice.
PROS
Shows all information about the cache
Can highlight cache’s to indicate found
(zoom in so you only see the one cache, click (…), Highlight, Add Highlight, Visible Caches)
CONS
Price
Can’t easily mark found caches with ‘Log Geocache’ (but can highlight)
Requires login (though an account is free)
– you must create an account at geocaching.com, Cachly uses this account
Directions
Offline Lists can be created in Cachly and are accessed by the “Lists” item in the bottom nav. A list will be created here and the GPX file imported to it following these steps.


This walk through creates a simple PowerBI MVC app that can embed reports. It uses the App-Owns data model popular for use by ISV’s.
Make sure the account you’re using is a Power BI Pro account. You’ll need a Pro account to do embedding.
First, we need to get the app we’re going to build registered with Active Directory. Login to PowerBI and go here:
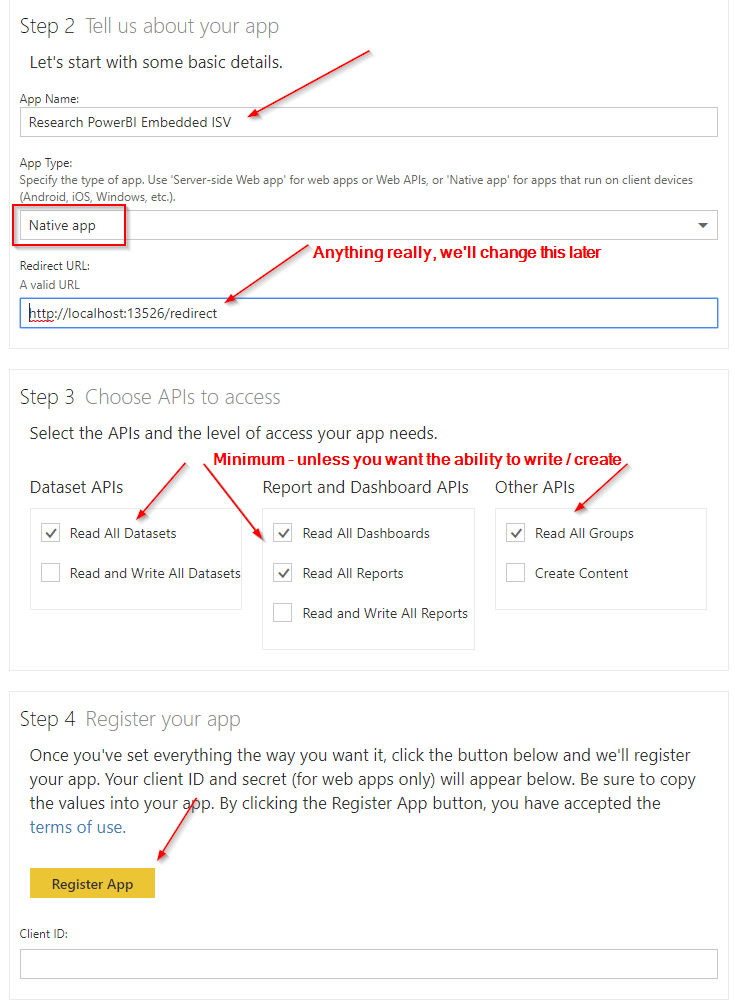 Make sure to select Native app. Even though we’re embedding to a web page we still need to select Native app. ‘Server-side Web app’ is for something else.

Write down your Client ID. This is the same as what Azure calls the Application ID.
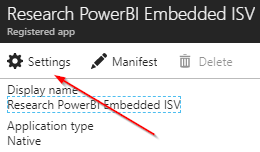
Your app will access the REST APIs via a master account. In order to do this the master account must be given permission. This is done by logging in to the Azure portal using the master account and going to Active Directory / App registrations. Make sure to select ‘All apps’ so you can see your embedded app.


We need to enable “Access the directory as the signed-in user”.
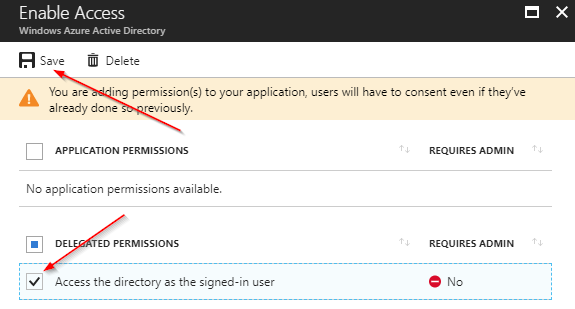
And finally, Grant those Permissions. The master account you’re logged in as now has those rights.

Power BI rights should automatically be configured when the app was registered. If not, click Power BI Service, select the necessary Permissions, Save, and Grant Permission for those as well.
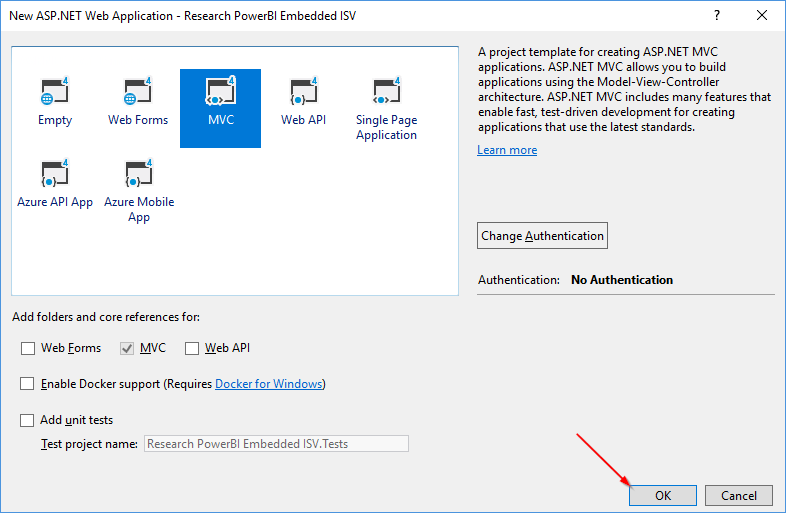
Visual C# / ASP.NET Web Application (.NET Framework)

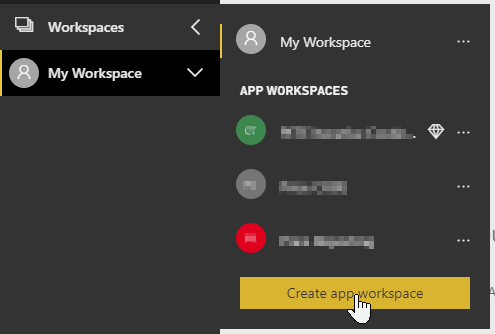
This is where your PowerBI .pbix files will be uploaded to.


Click on your new App Workspace to open it.
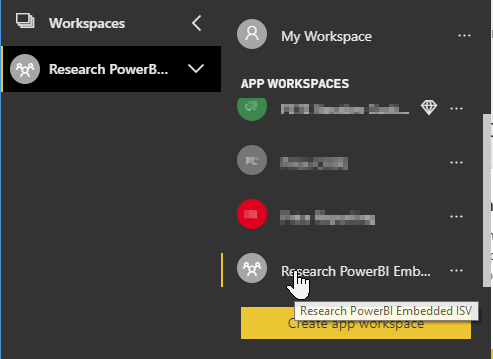
And copy the GUID from the Url. This is your Group Id (App Workspaces used to be called groups).

I’ve always got a simple of simple PBIX lying around for testing. Mine’s called Colors.pbix. Feel free to download and rename (don’t extract, just rename) to Colors.pbix.
Open your PBIX, make sure your logged in under the master account, then Publish your file to your new App Workspace.

Use the Client ID you saved off during App Registration above to set “pbi.clientId”
Use the Group ID we got from creating our new App Workspace above to set “pbi.groupId”
Then use the master account’s credentials for “pbi.user” and “pbi.pass” (obviously encrypt your password or use something like KeyVault).
I won’t be organizing my code as one should in a real project but for Demo purposes it will do and make things easy peezy.
Add a class to the Controller folder called EmbedManager.cs
Using NuGet install the following packages:
* Microsoft.IdentityModel.Clients.ActiveDirectory
* Microsoft.PowerBI.Api
Add some using statements & pull in your App Settings.
using System.Diagnostics;
using System.Configuration;
using Microsoft.IdentityModel.Clients.ActiveDirectory;
using Microsoft.Rest;
using Microsoft.PowerBI.Api.V2;
using Microsoft.PowerBI.Api.V2.Models;

public class EmbedManager
{
    private static readonly string _authUrl = ConfigurationManager.AppSettings["oauth.authorize"];
    private static readonly string _resourceUrl = ConfigurationManager.AppSettings["pbi.resource"];
    private static readonly string _apiUrl = ConfigurationManager.AppSettings["pbi.api"];

    private static readonly string _clientId = ConfigurationManager.AppSettings["pbi.clientId"];
    private static readonly string _groupId = ConfigurationManager.AppSettings["pbi.groupId"];

    private static readonly string _userName = ConfigurationManager.AppSettings["pbi.user"];
    private static readonly string _password = ConfigurationManager.AppSettings["pbi.pass"];
}
The first thing you need is an access token so you can make calls into the PowerBI REST API.
/// Get Token Credentials using the master accounts user/pass
public TokenCredentials GetTokenCredentials()
{
	UserPasswordCredential credential = new UserPasswordCredential(_userName, _password);
	AuthenticationContext authContext = new AuthenticationContext(_authUrl);
	AuthenticationResult authResult = authContext.AcquireTokenAsync(_resourceUrl, _clientId, credential).Result;

	if( authResult == null )
		throw new Exception("Unable to authenticate");

	return new TokenCredentials(authResult.AccessToken, "Bearer");
}
Since all Embedded functionality works through App Workspaces, all your REST API calls using the PowerBIClient wrapper need to use the InGroup version.
Let’s make our first call into the API to get a list of reports from the App Workspace we created.
public IList GetReports()
{
	using( var client = new PowerBIClient(new Uri(_apiUrl), GetTokenCredentials()) )
	{
		// The Embed API requires a Group so all calls must be 'InGroup'
		var reports = client.Reports.GetReportsInGroupAsync(_groupId).Result;
		Debug.WriteLine($"Report Count:{reports.Value.Count()}");
		foreach( var report in reports.Value )
			Debug.WriteLine($"{report.Name}, {report.EmbedUrl}");
		return reports.Value;
	}
}
(see below if you have any issues compiling at this point)
Add a call to GetReports() from the Controller:
public class HomeController : Controller
{
	public ActionResult Index()
	{
		EmbedManager em = new EmbedManager();
		em.GetReports();

		return View();
	}
}
RUN!
If you haven’t given your app the proper AD permissions you’ll see this:
{"error":"invalid_grant","error_description":"AADSTS65001: The user or administrator has not consented to use the application with ID 'b0cc996e-9a83-4bf0-874b-50f0454e9858' named 'Research PowerBI Embedded ISV'.}
See “Apply Azure AD permissions” above to give the correct permissions.
If all goes well, look at your Output window and you should see:
Report Count:1
Colors, https://app.powerbi.com/reportEmbed?reportId=1234-555-6789&groupId=3d36aa92-c1b0-434d-92a1-24ee3b67b039
That’s it! The hard parts done. Now all you have to do is embed the report!
Let’s do it…
Create a tiny class to hold just what you need for embedding.
public class EmbedConfig
{
	public string ReportId { get; set; }
	public string EmbedUrl { get; set; }
	public string EmbedToken { get; set; }
}
We’ll also want to get an Embed Token. Technically you can use your Access Token to embed the report, but don’t! That’s a security risk because anyone with that token could view other reports that token has access to. Instead, we want a report specific token that will expire.
public void GetEmbedToken(Report report)
{
	using( var client = new PowerBIClient(new Uri(_apiUrl), GetTokenCredentials()) )
	{
		var generateTokenRequestParameters = new GenerateTokenRequest(accessLevel: "view");
		EmbedToken tokenResponse = client.Reports.GenerateTokenInGroup(_groupId, report.Id, generateTokenRequestParameters);

		var embedConfig = new EmbedConfig()
		{
			EmbedToken = tokenResponse.Token,
			EmbedUrl = report.EmbedUrl,
			ReportId = report.Id
		};
	}
}
Update our HomeController
public class HomeController : Controller
{
	public ActionResult Index()
	{
		EmbedManager em = new EmbedManager();
		var report = em.GetReports().FirstOrDefault();
		if( report == null )
			throw new Exception("Ah! No report!");

		var config = em.GetEmbedToken(report);
		ViewBag.EmbedConfig = config;

		return View();
	}
}
Add use our EmbedConfig in the View to show the report.
@{
    ViewBag.Title = "Home Page";
}
(function () { var embedToken = ‘@ViewBag.EmbedConfig.EmbedToken’; var embedUrl = ‘@ViewBag.EmbedConfig.EmbedUrl’; var reportId = ‘@ViewBag.EmbedConfig.ReportId’; var iframe = document.getElementById(‘ifrTile’); iframe.src = embedUrl; iframe.onload = function () { var msgJson = { “method”: “POST”, “url”: “/report/load”, “headers”: { “x-sdk-type”: “js”, “x-sdk-version”: “2.3.2”, “uid”: “87oes” }, “body”: { “settings”: { “filterPaneEnabled”: true, “navContentPaneEnabled”: true }, “type”: “report”, “tokenType”: 1, /* 0 for Access Token */ “accessToken”: embedToken, “embedUrl”: embedUrl, “id”: reportId, “permissions”: 7, “uniqueId”: “87oes” } }; iframe.contentWindow.postMessage(msgJson, “*”); }; }());
OK, so that’s not the recommended way to do the Javascript part of the embedding. But that’s what’s going on under the hood and doesn’t require any other JavaScript libraries. Check out this great article for tons more details.
To do it right, use the PowerBI Javascript library and do it like this.
That’s it! Happy embedding.
Issue: Could not load file or assembly ‘Newtonsoft.Json, Version=7.0.0.0
Solution: Manage NuGet packages for Solution, Install 7.0.1
Here’s a great sample project that includes all the code necessary to create App-Owns and User-Owns projects.
Took me awhile to work out the specifics but this works. You can have the exact VM running on a Premium storage account up and running again on a Standard storage account in only a few minutes. Note: this is for ARM, not classic.
$sourceBlobUri = "https://yourpremiumstorage.blob.core.windows.net/vhds/yourvhdname.vhd"
$sourceContext = New-AzureStorageContext –StorageAccountName "yourpremiumstorage" -StorageAccountKey "AsFRVDK3wH3mBfagiym6OdkC"
$destinationContext = New-AzureStorageContext –StorageAccountName "yourstandardstorage" -StorageAccountKey "JeQdlvNXZ+Vq6"
Start-AzureStorageBlobCopy -srcUri $sourceBlobUri -SrcContext $sourceContext -DestContainer "vhds" -DestBlob "your-new-vhd-name.vhd" -DestContext $destinationContext
Next, create a new VM using the copied VHD. This came from here, then I modified to use an existing VNet rather than creating one.
## Global
$rgName = "resource-group-name"
$location = "westus"

## Storage
$storageName = "yourstandardstorage"
$osDiskUri = "https://yourstandardstorage.blob.core.windows.net/vhds/yourvhdname.vhd"

## Network
$vnetName = "your-net"
$subnetName = "your-subnet"
$nicname = "nic-name"
$ipname = "ip-name"

## Compute
$vmName = "vm-name"
$vmSize = "Standard_A2"
$osDiskName = $vmName + "osDisk"

#Setup Network
$vnet = Get-AzureRmVirtualNetwork -Name $vnetName -ResourceGroupName $rgName
$subnet = Get-AzureRmVirtualNetworkSubnetConfig -Name $subnetName -VirtualNetwork $vnet

$pip = New-AzureRmPublicIpAddress -Name $ipname -ResourceGroupName $rgName -Location $location -AllocationMethod Dynamic
$nic = New-AzureRmNetworkInterface -Name $nicname -ResourceGroupName $rgName -Location $location -SubnetId $subnet.Id -PublicIpAddressId $pip.Id

## Setup local VM object
$vm = New-AzureRmVMConfig -VMName $vmName -VMSize $vmSize
$vm = Add-AzureRmVMNetworkInterface -VM $vm -Id $nic.Id
$vm = Set-AzureRmVMOSDisk -VM $vm -Name $osDiskName -VhdUri $osDiskUri -CreateOption attach -Windows

## Create the VM in Azure
New-AzureRmVM -ResourceGroupName $rgName -Location $location -VM $vm -Verbose -Debug


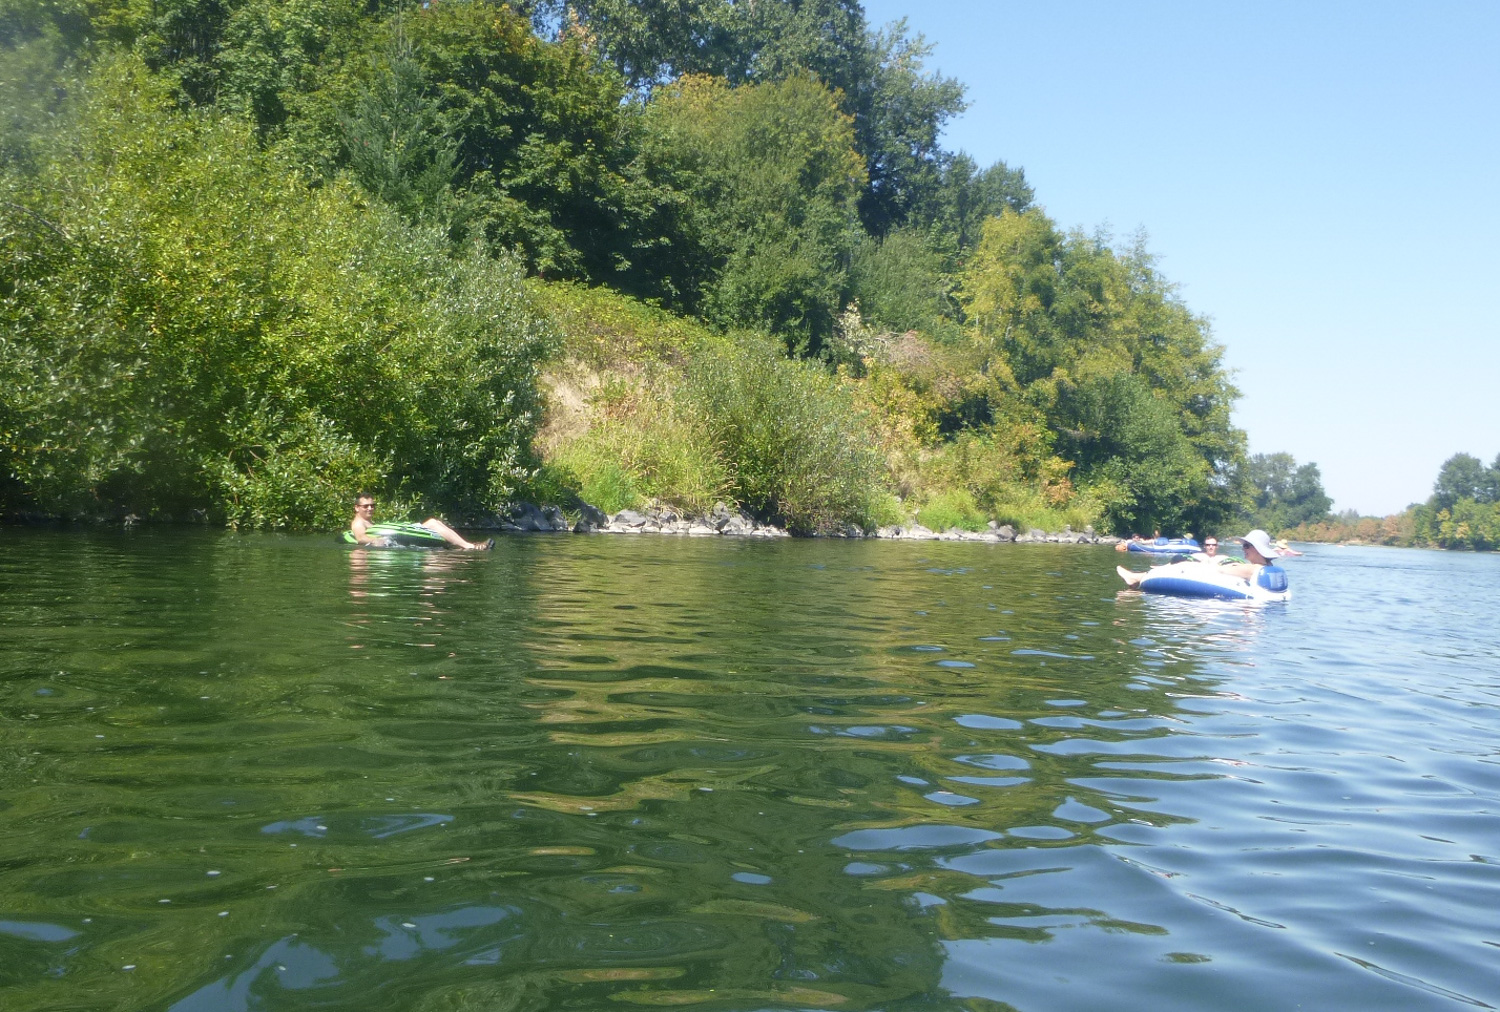
What do ya do when it’s 100°’s in Corvallis? You FLOAT!
[sgpx gpx=”/wp-content/uploads/gpx/corvallis-float.gpx” showele=”false” summary=”false”]
Total Distance: 2.98 miles
Total Time: 1:27